Wednesday, October 31, 2012

I Rescued My Kitchen Cabinet (In 15 Minutes or Less!)

As much as I love decorating, you'd think that I'd enjoy cleaning as well! Unfortunately, cleaning-- at least the regular, every-day, clean-it-even-if-it's-not-obviously-dirty kind-- is the bane of my existence. I do enjoy taking something that's clearly a mess and whipping it back into gleaming, organized shape-- sadly, this means that I generally end up waiting till things are obviously dirty before I notice them!

Case in point: my under-sink kitchen cabinet:

Yep, keeping it real, folks!

Yes, it definitely needed a rescue! The clutter is obvious-- what's you can't see in the picture is the black, slimy, grimy cabinet floor!  Thankfully, Flylady has taught me that I can do ANYTHING for 15 minutes-- even cleaning out an extremely cluttered, DIRTY cabinet!


I emptied everything out of the cabinet and threw away everything I didn't need-- musty, dried-up sponges or rusty Brillo pads, anyone? Then I set out to conquer the white-turned-black shelf (the picture above was taken when I was about halfway done!) Soap and water just weren't doing the trick, so I turned to my secret non-abrasive cabinet-cleaning weapon: baking soda!

Baking soda is a great scrubbing agent for anything that you don't want to scratch: cabinetry, furniture, refrigerator shelves, stovetops (especially glass ones), and more.
(Just make sure to rinse it off thoroughly so it doesn't leave a white film on the glass)
Pin It!

Once the shelf was returned to its original cream-colored state (one thing kitchen designers DON'T tell you is how HARD it is to keep white or light-colored cabinets looking clean!), I tried to find a way to reorganize everything in a sensible manner. You see, in a sensibly organized cabinet, putting something away RIGHT will only take, at the most, a few seconds-- leaving me with NO EXCUSE for NOT keeping things neat!


I folded all the paper bags in half and put them all inside one large paper bag (I use paper bags for discarding broken glass items safely-- such as my poor owl-- as well as for craft purposes). The large cleaner refill bottles also got put in the back, since they don't get accessed as often. The wire shelf (which was already there-- just not being put to use properly!) holds my frequently-used spray cleaners, and the trash bags fit perfectly underneath!

(Sorry about the terrible quality on this pic-- I snapped it with my cell phone because my camera is currently on the lam :( If you think about it, please pray that I can find it by Saturday!)
Since I don't use my dish drainer for its intended purpose (I wash my dishes under running water and stack them on the countertop for immediate drying-and-putting-away-- otherwise they just pile up and give me a headache!), I decided to turn it into an organizer, as well! The silverware cup holds the few sponges and scrubber pads that I kept. The red basket holds my plastic shopping bags (which I use mostly for dirty diaper disposal ;) ), and my Swiffer pads fit perfectly along the end of the plate rack!


With all the extra room I created, I had enough space to store my cookie sheets in here, too! It is the only cabinet tall enough to hold them standing up. In the past, I was stuck on keeping them in the same cabinet with the rest of my pots and pans-- even though they had to be kept laying down, with the rest of the pots on top of them (causing continual slipping, sliding, and disarranging of the pots and pans as well). Now they have their own place, where they don't get scratched, and the pots are nice and neat as well!


Pin It!

Tada! A neat, CLEAN undersink cabinet, in 15 minutes or less! Thank you, Flylady! (She's also got a wonderful list of daily cleaning routines, that I'm working on mastering, so things don't get so bad again!)
So have you done any reorganizing lately? Any crisis cabinet cleaning? Any repurposing of dish drainers as organizers? Or moving things (like baking sheets) around into places that actually make more sense? ;)


P.S. Check out my new "Project Gallery" up on top bar, and see if there are any projects you've missed!

Friday, October 26, 2012

Neutral Autumn Bookshelf Reveal

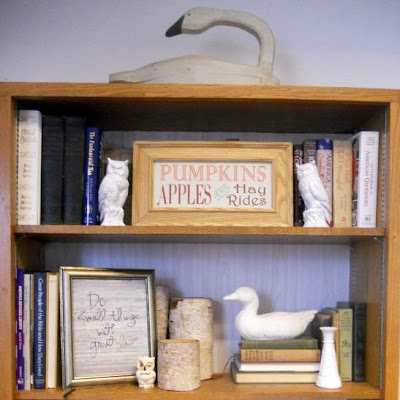
It's finally here! Yes, I'm finally getting around to show you my decorated-for-fall bookshelf! (And yes, it's almost winter here...)

I've already done a few tweaks since I showed you that "sneak peek" last week (hey, that rhymes! Ok, Kathryn, no need to be such a dork...) But I'm sure I'll be doing plenty more, so I've gotta just suck it up and show it to you now, or I never will!


If you were here last week, I showed you the "Pumpkins, Apples and Hayrides" sign that I made for the top shelf. (Click here if you want to download your own copy!) You also saw the makeover of my two beloved owls, whom I have now christened Owlexander and Owlbert (thanks to my fabulous sister for the name suggestions!) They now guard the house from the top shelf (and stay out of reach of my Little Monkey!)


Though I didn't really start out with a theme (other than "neutral" and "nature"), it kind of developed into an "fowl" theme-- as you can see, there are birds everywhere! My owl twins are kept company by a white ceramic duck (found at Goodwill), a cream-colored owl salt shaker (from the Habitat for Humanity thrift store), and a white "turkey" salt shaker (shhhh... actually he's a rooster, but we're pretending he's a turkey for Thanksgiving... please don't call "fowl" on me!)


I found the aqua and gold Virginia City plate at my local Goodwill-- the aqua perfectly matches my chalk-painted dining room console table! And I have fond memories of visiting Virginia City with my family growing up, so I love it! The birch candleholders came from a garage sale-- I think I paid $2.50 for the set?


More thrifted things continue on the next shelf: the white book basket, "Fresh Eggs" sign, the little green squirrel, and the birdbath soap pinecone holder all came from Goodwill (all collected over time!) Are we sensing another theme here? :)


On the fourth shelf (the easiest for my Little Monkey to reach), I try to keep only the most unbreakable of decorations: sweater pumpkins (I tried to copy these, but they kind of came out lumpy-- or maybe that's from being used as footballs by a 14-month-old!) on an already-distressed metal candlestick, deer antlers (from my first, and so-far ONLY buck that I've shot... yes, I'll be going hunting again this fall!)...


and a glass-less frame with another printed quote (find the original post here).


So there she is-- my Autumn Neutral/Nature/Bird-themed bookshelf!

Pin It!

Have you decorated with a theme at all this year? Do you like to go all out with bright color for fall, or do you prefer more subtle, neutral autumn decor?


P.S. Check out my new "Project Gallery" up on top bar, and see if there are any projects you've missed!

Tuesday, October 23, 2012

Thrifty Fall "Mantel" Tweaks


Pin It!

Ever buy something with a definite plan in mind of using it one way, only to end up doing something completely different with it than you intended?


Take this little jar, for example. I had actually overlooked it at Goodwill several times because of its nondescript, ivory color, but for $0.99 I figured I could make it over easily! As a matter of fact, I had every intention of spray-painting it a fantastic color, like aqua, as soon as I got it home! But when I set it on my fall "fantel" (faux mantel-- actually my desktop) to take the "before" picture, I realized that it was exactly what my mantel display needed!


Here is my fall mantel before the addition of the jar-- not terrible, just missing something...

L to R: Yarn balls (Goodwill) & leaves (back yard) in corked jars (yard sale), mirrored star from Goodwill, wicker decorative balls (Walmart- clearance) in lidded glass jars (Goodwill), "GRATITUDE" sign (yard sale) on old books (thrift stores), ivory jar from Goodwill, spray-painted silver pumpkins & pears with pheasant feathers (found) in glass vase (thrift store)

...But the jar perfectly fills in the gap! I'm not saying that I won't end up spray-painting it aqua at some point in the future... but for now, it's found a perfect, albeit accidental, home!

Moral of the story: Don't get stuck on one plan, use, or location, for your decorations!  If you have an area you think is "missing something", shift things around-- you just might find the perfect answer was right under your nose all the time! :)

So have you been doing any decor "tweaking" lately"? Made any last-minute changes, or spur-of-the-moment makeovers?


P.S. Check out my new "Project Gallery" up on top bar, and see if there are any projects you've missed!

Saturday, October 20, 2012

Pumpkins, Apples, and Hayrides Sign- FREE PRINTABLE!

Hey, I just wanted to pop in and share a cute and easy sign I made for my autumn bookshelf. (I think my shelf is FINALLY ready to be revealed--  fingers crossed that I'll share that next week! But here's a sneak peek!)


This frame originally had a very nice, professionally mounted country-patriotic scene in it. Unfortunately, it was just too "primitive" for my tastes... but I knew it would make the perfect frame for a sign!


I fell in love with Classy Clutter's cute painted fall sign, but instead of painting it, I decided to print it! I used Microsoft Publisher to make a banner with the dimensions of the inside frame (5" x 12"), then printed it out on ivory textured paper.


Voila! The perfect finishing touch for my fall bookshelf!


Pin It!


And guess what? I even made it into a downloadable file just for you, so you guys can have it for free! (And I made it in two versions- one with the "AND" aqua, and one with it green--- I ended up using the aqua just to bring a touch of it into my fall decorating, but the green is probably more visible)

Just click the link to open, then press the "save" button to download the sign in Adobe PDF format! Or if you prefer a .JPEG, just right click the picture and click "Save Picture As".


That's my special gift to you, my beloved followers! (If you don't already follow A Heartful Home, I'd love for you to-- whether through GFC or by email!)

Have a happy fall weekend!


P.S. Check out my new "Project Gallery" up on top bar, and see if there are any projects you've missed!

Thursday, October 18, 2012

I'm Seeing Green-- Vase to Lamp Makeover!

Has anyone else been drooling over these green glass lamps from Pottery Barn?


Unfortunately, $170 is (slightly) out of my budget for a lamp. (Hey, it's still cheaper than this $230 one from Layla Grace!)


So last week, when I spotted this ginormous green seeded glass vase at Goodwill, I knew I could turn it into just the lamp I wanted! The only problem was the price: I've NEVER paid $19.99 for anything at Goodwill in my life! I walked away-- reluctantly. 

I drooled over it every time I went in the store, though, and finally this week when payday arrived, I promised myself that if it was still there, I'd get it. (After all, it met my most important criteria for a large purchase: not being able to get it out of my head!)

And it was! *cue jumping up and down and clapping* (Though I did have to do some searching-- it was tucked away under a bottom shelf in another section! (I think someone else wanted it, too) ;)

It was time for a vase-to-lamp transformation!

1) Vase, plus...


...2) "cork" (actually a log swiped from our woodpile, that fit the opening perfectly-- which I then cut down to about 4" long), plus...


...3) lamp kit (mine actually came from my old lamp junkyard collection-- if you don't have one of those, lamp kits are only a few bucks at your local hardware store) ;) equals...


... TADA! One gorgeous designer-knock-off lamp!


Pin It!

I had picked the shade up at a garage sale, but it has several cracks in the plastic lining that show up when the light is on. :( Solution: cover it with sisal rope! Unfortunately, I had already hot-glued several rows of rope around the shade, when I realized I was going to run out of rope before it was completely covered. So I just stopped with a border... then I realized that I kind of like it that way ;)


Now I need you to help me decide whether I should leave it with the rope border, or go ahead and buy more and finish covering the whole shade ;) (like this one)

One of the parts that I really love about this lamp is the battery-operated twig lights that came inside the vase! (So the base lights up, too!)


Shh... don't tell my husband, but I think I'm in love! ;)


So have you ever transformed a vase-- or any object-- into a lamp? Or made over a lamp shade? Let me know!


Tuesday, October 16, 2012

The Tale of Two Owls: A Spray-Paint Story

'Member the sad day when poor Owl-rick bit the dust? :'(

Well, ever since then, I've been searching for another sweet ceramic owl to take his place (albeit a higher, safer place this time-- out of reach of little grabbing hands...) Sadly, Target no longer had the little owl pencil holders. And I couldn't force myself to shell out $16 for a similar one from Anthropologie (though I seriously came close-- that's how badly I wanted an owl!)

I thought I had scoured every thrift store in the area, but last week I decided to stop at an out-of-the-way St. Vincent de Paul that I hadn't been to in a while (they also have exorbitantly high prices, for a thrift store!) Lo and behold, what to my wondering eyes should appear, but not one but TWO ceramic owl figurines!


Yes, twin brother owls, just waiting for me to adopt them, bring them home, and give them a makeover!!! No, they weren't exactly the same as my stubbier, chubbier Owl-rick, but they were OWLS, and they were adorably cute in their own way. And for the price of $1.00 each... well, how COULD I say no???

I knew what I wanted to do with them already: give them glossy white coats, just like the one I had given Owl-rick shortly before his untimely demise. So the next time I was at Walmart, I grabbed a 99-cent can of gloss white spray paint, and got right to work.


I decided to do a "test" to see if scuffing up the surface made a difference in how well the paint adhered. I used a scuff pad to rough up one of the owls, and left the other untouched (neither of them had a really shiny coat to begin with).  It seemed like both of them took paint just as well-- they both required about four coats to completely cover their "dark past" (one can of spray paint just finished both owls)

I did learn an important spray painting lesson, though... I was wondering why, like the time I painted my wicker basket chair, the spray paint only seemed to stick to some parts and not others! Then I realized that I was holding the spray can only 4-6 inches from the owls, and the air from the spray was actually "blowing" the paint out of the crevices that I was trying desperately to fill!  Lesson learned: hold the spray paint can about 12 inches from the object you are trying to paint, and let the paint "mist" onto the object, instead of "blast"! Maybe it wouldn't have taken four coats if I'd have sprayed it right from the beginning! LOL!

(Want more spray-painting tips? Check out my other spray paint projects here)


So the twin brothers are now great white owls! They currently grace the TOP SHELF of my dining room bookshelf. My littlest monkey is fascinated with them, however-- he stands in front of the shelf and makes "hooting" noises at them! :)  It's a good thing he can't reach these guys!

Fittingly enough, the day after I finished my pair, I spied these at One Kings Lane:


For only $19.00 for the pair, I might just have bought these in my previously owl-desperate state. But I think I like my price of $3.00 (including spray paint) a lot better!


I'm still trying to think of appropriate names for them, though... Hooty One and Hooty Two?  Screech and Scratch? (Sounds too much like Cheech and Chong...) *sigh* Guess I'll just have to wait for the right inspiration to strike..

So have you done any thrift store rescues lately? Any spray paint makeovers? Got any name suggestions for my owly pair? Let me know!